
This page provides a comprehensive guide on how to use the Shopify app “PicSyng – ex Product Imager” It includes all the necessary information, so make sure to read it carefully.
For those who want to immediately learn how to create a CSV file, please refer to the CSV guide below.

About “PicSync”
PicSync – ex Prudct Imager is a Shopify app that automates the process of adding product images to your store. For more information, check out the app’s page on the Shopify app store.
Handle Match Feature
On October 22, 2023, a powerful new feature called “Handle Match” was added to the app. Please refer to the following article for more details.
How to use
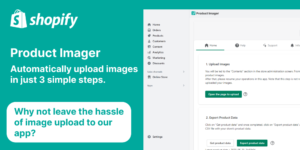
The Shopify app “PicSyng – ex Product Imager” simplifies the task of adding product images by breaking it down into three straightforward steps. For a better understanding of how it operates, we suggest installing the app.
- Preparation: Registe products and upload images in the store
- Export products data
- Enter image file names in the CSV file
- Upload the CSV file
In this user guide, we will demonstrate how to add images to the “sample” product page by uploading a CSV file below.

1. Preparation: Register products and upload images in the store
Prior to utilizing the app, please ensure that you have completed the following tasks within your store.
Register products
We have kept the explanations on this page brief. If you would like more information on streamlining product registration, we recommend checking out this blog post.
Upload product images
Next, let’s upload the product images to the store.
1. Click on “Open a window to upload” in the app
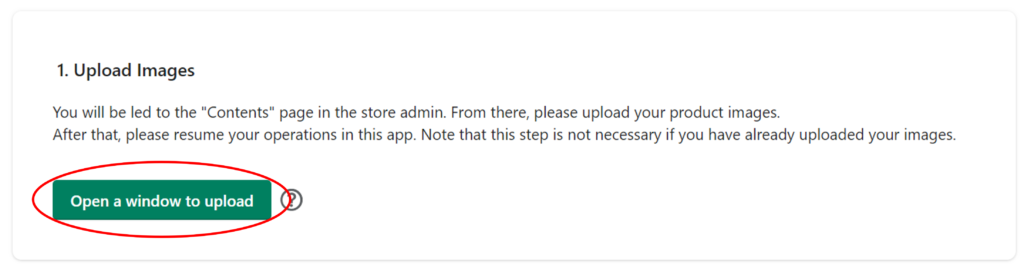
This will open the store’s admin screen (“Files” page).
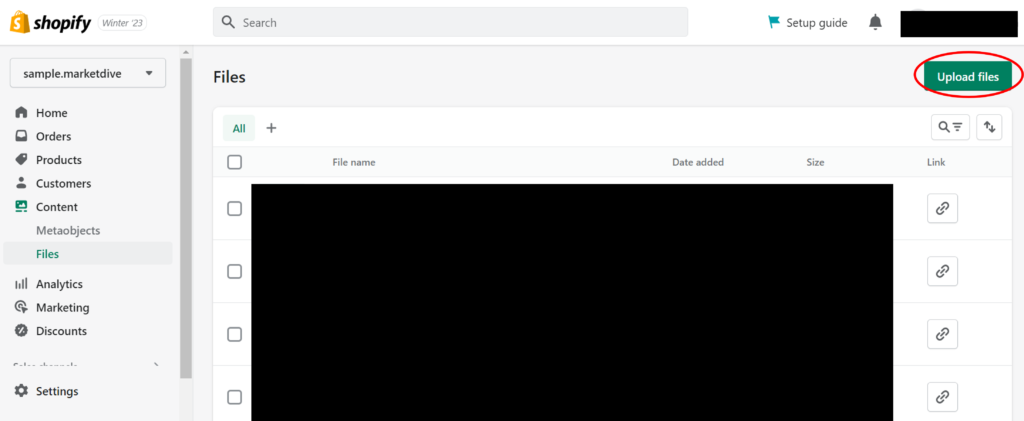
2. Click on “Upload files” in the admin screen
<Note>
- It is essential to use unique file names for all images.
- Please avoid using double-byte characters and dots (.) in image file names as it may cause the file names to be converted to random alphanumeric characters within Shopify, preventing the files from being linked with this application.
You have now completed the process of uploading product images.
2. Export products data
Next, we will export the product data to a CSV file. We will use an example of a store that has only registered two variants of the following sample products.
1. Click on “Get product data”
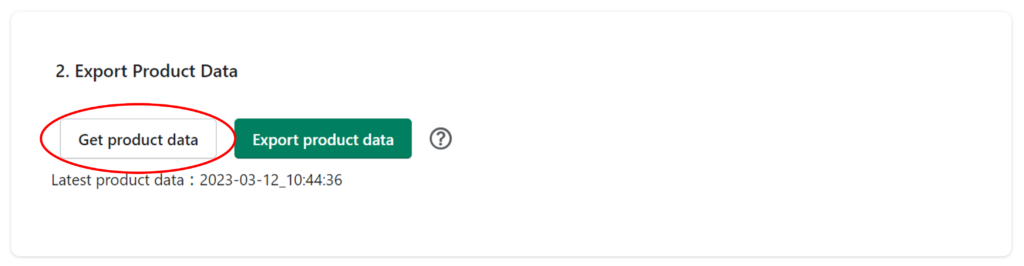
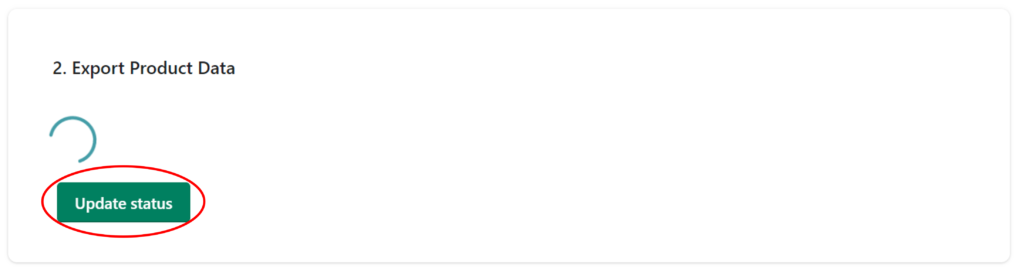
2. Click on “Update Status”
If the screen does not change even after clicking, please wait for a while and click again. Until the product data is acquired, you can leave the app and do other tasks.
3. Click on “Export Product Data”
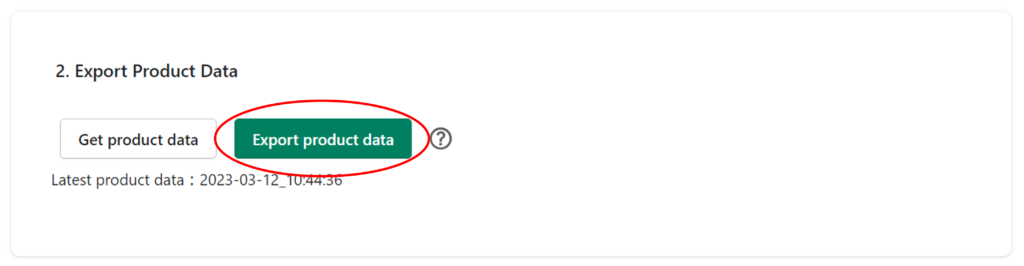
The file that is exported contains the Handle and Title of all product pages within your store. For this example, a CSV file shown below will be downloaded.

3. Enter image file names in the CSV file
Next, fill in the image file names that correspond to the products and variants. The task can be broken down into the following two patterns. Let’s examine each one.
A: Add product images
Initially, we will enter the file name of the images that are displayed in common for a product, regardless of variants. For the rows of the products you want to add, please enter the image file names in columns G and onwards. Be sure to include the file extension (e.g. .img, .png) of the image files. In the case of the sample product, it would be in the area highlighted in the image below.

After you have entered the image file names, your CSV file will look like this. In this example, we are adding 3 images, so the file names are entered in the “image 1” through “image 3” columns.

<Note>
- The CSV template that you export allows for the addition of up to 10 images per product. If you wish to add more than 11 images, please add additional columns. The title of each column should be numbered consecutively starting with “image11.”
- Due to Shopify specifications, the maximum number of images that can be added to one product is 255. Be sure to adhere to this limit.
B: Add variant images
If you wish to add images for a specific variant of a product, please enter the file name of the image you want to add in column F (variation image) of the row where the option value you want to add is written. For the sample product, this would be in the area highlighted in the image below.

The CSV file after entering the image file names looks like this. In this case, we add images for the variants “Red” and “Blue”, so we enter the image file names in column F of the rows where the respective option value is written.
<Note>
- It is only possible to add one image per variant. Therefore, you should not add more than one “variation image” column.
- The variant image file name (to be entered in column F) must also be entered as a product image for the same product.
With that, you have completed the creation of the CSV file.
4. Upload the CSV file
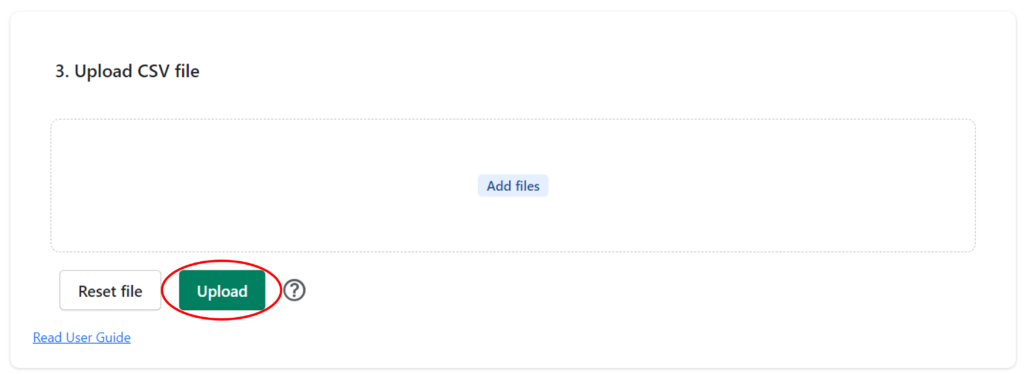
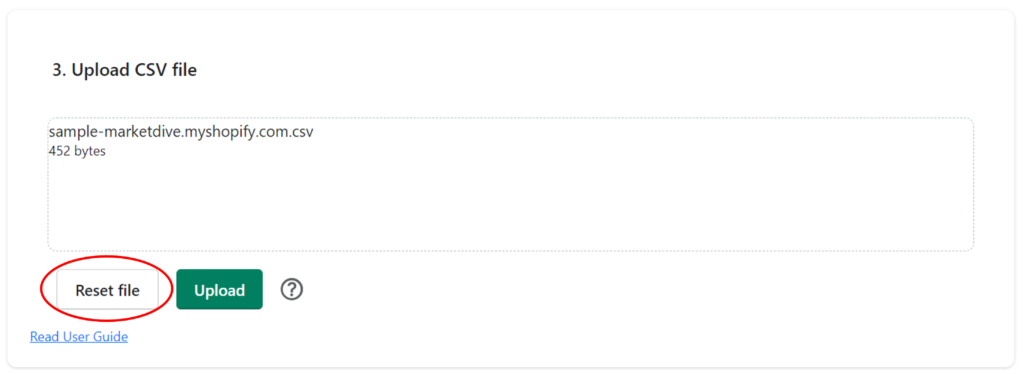
Finally, upload the CSV file created in step 2 to the app. Open the app, drag and drop the CSV file into the upload field, or select the CSV file from “Add files”, and click “Upload” to upload the file.
After selecting the CSV file, the screen will look like the following. You can reset the file by pressing “Reset file”.
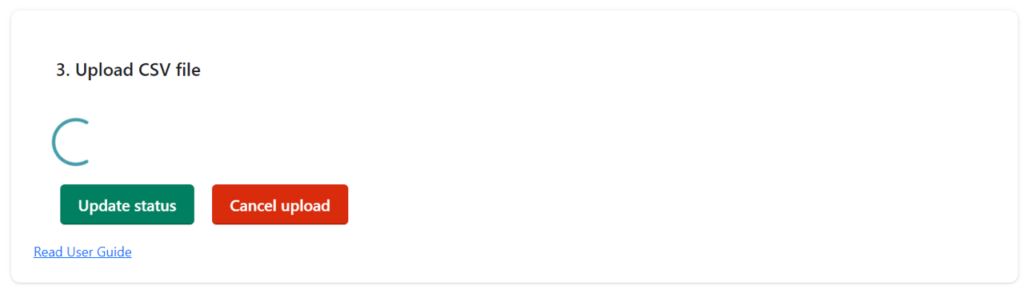
After clicking “Upload”, the following screen will appear. Click “Update Status” or move to another screen and then return to the app. If the app has returned to the original screen, the upload is complete.
You will receive a completion message indicating success after uploading the file.
<Note>
- You can leave the app and do other work until the processing is complete. If the processing is not yet complete when you return to the app, please check by pressing the “Update status” button.
- If you wish to cancel the registration in the middle, please press the “Cancel upload” button. The images completed up to that point will be added, and the rest of the registration will be canceled.
- If all the registrations are complete, you will return to the original screen.
Once the upload is complete, verify that the product images have been added correctly. To do this, navigate to “Products” and view each product page. The process is complete if the images have been added correctly.
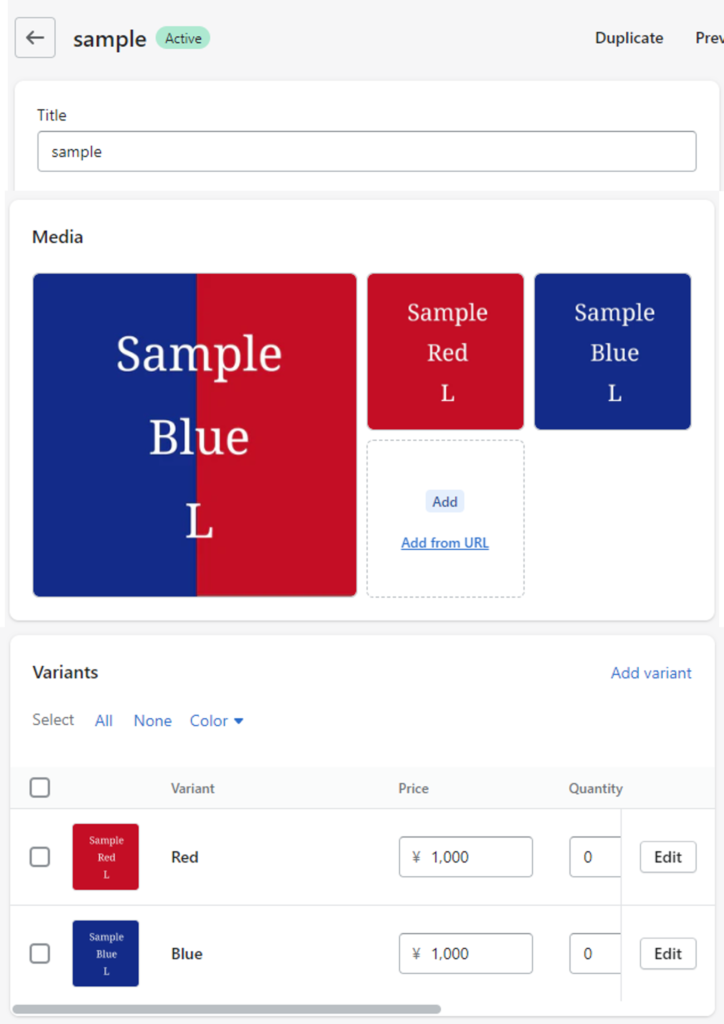
With this operation, we have added 3 product images and 2 variant images as shown below.
If the images have been added as entered in the CSV file, the operation of the app is complete. Thank you for your efforts.
Appendices
1: Feature: File uploads
If you upload a CSV file that contains a different image name for a product that already has images added, or if you upload a CSV file with a blank image column for that product, the process will proceed as follows:
- If uploading a CSV file with another image name for a product for which images have been added: The existing images will be deleted and only the new image you’ve entered will be added.
- If uploading a CSV file with a blank image column: Nothing happens.
2: CSV file structure
The structure of the CSV file is shown in the image below.
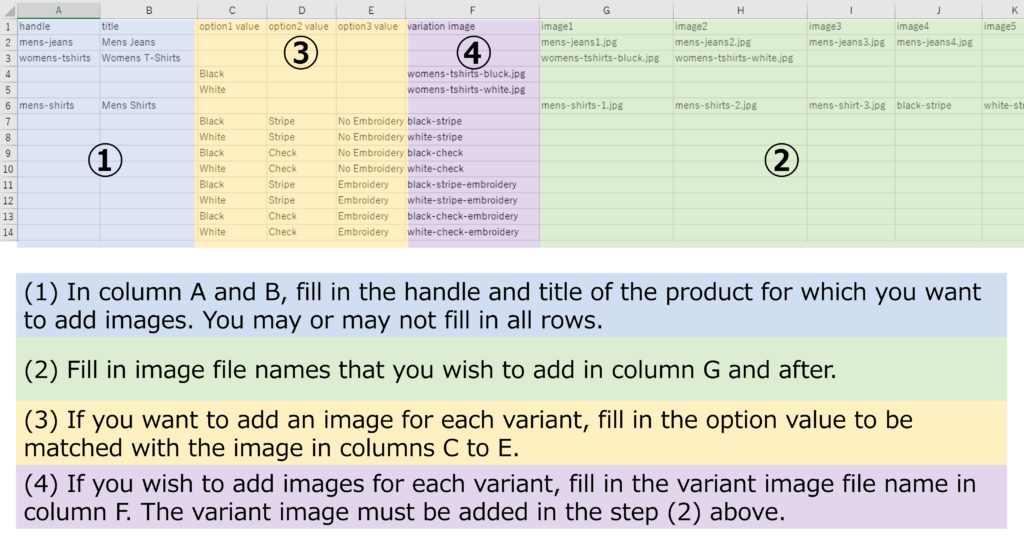
The column structure is as follows as written in the image above.
| Column No. | A | B | C~E | F | G and after |
| Column title | handle | title | option1~3 value | variation image | image1 and after |
| Description | Handle of the product page where the image is added | Title (product name) of the product for which the image is added | Option value of the variants to be matched with the unique image | Image file name to be added as variant-specific | Image file names to be added to the product page |
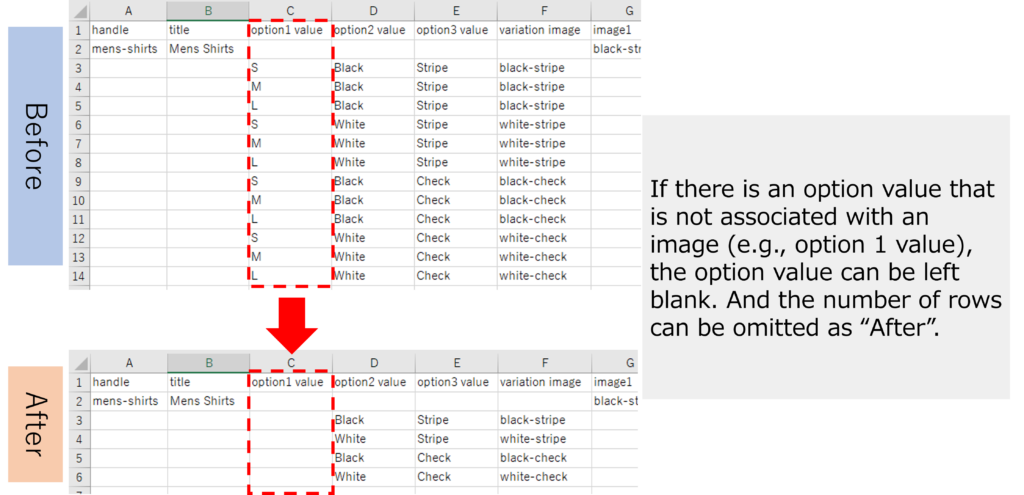
However, as shown in the image below, you do not need to fill in the option value if any option value does not associate with a variation image.
If you have not installed the Product imager, please be sure to try out it here (Shopify App Store)! It has a free plan available.
3: Pricing plans and benefits
Please see the following page for the pricing plans and benefits of PicSync – ex Product Imager.
FAQ
Q1. I uploaded a CSV file to the app, but it resulted in an error. What could be the cause?
A1. The main causes of the error and their corresponding solutions are as follows:
- The character encoding of the CSV file is not in UTF-8 format. Please save the CSV file in UTF-8 format and upload it again.
- The image file name contains full-width characters. Please change the image file name to half-width characters.
- The capitalization of the image file name is incorrect. Please check if the capitalization of the image file name is entered correctly.
- The desired image file has not been uploaded. Please check if the necessary images are uploaded in the “Files” pafe of the store admin screen.
- Some columns have been deleted. Please do not delete any columns in the CSV file, even if they are blank.
Q2. Even though the image file name is correct, the variant images entered in the variation image column is not added. What should I do?
A2. Please check if the variant image file name is entered in both the “image” and “variation image” columns. If it is not entered in both columns, the variant image cannot be added.
This concludes the usage guide. Please email to “info@marketdive.jp” if you have any inquiries. We also support efficient creation of the CSV file.
Thank you!